Best Practice User Guide for Practical Classes
eLabJournal also offers a solution for teachers to organize practical classes. One of the main reasons why teachers choose the eLabJournal ELN for classroom use - besides alleviating the burden of carrying students' paper lab notebooks - is to familiarize students with state-of-the-art digital developments in scientific research by teaching them how to document their research in accordance with current laboratory standards. eLabJournal offers a dedicated solution and license model for the usage in the classroom. This guide is intended to demonstrate how you as a teacher can set up eLabJournal for educational purposes.
1- Setting up a Group
A group is a secure environment that is used to share information among its members. To organize a class, you should start by setting up a group. You can choose to set up one group for each course, but we recommend creating a single group for all courses during the year. Choose a name for your group, such as the name of your organisation or the name of the educational program.

2- Setting up Roles and Permissions
To ensure that teachers and students have the appropriate permissions to view and update information within the system, it is important to set up user roles and permissions. Apart from the standard roles in the system - Administrator and Normal - we recommend creating at least two additional user roles: Teacher and Student. Navigate to Permission in the Configuration menu to define these user roles.
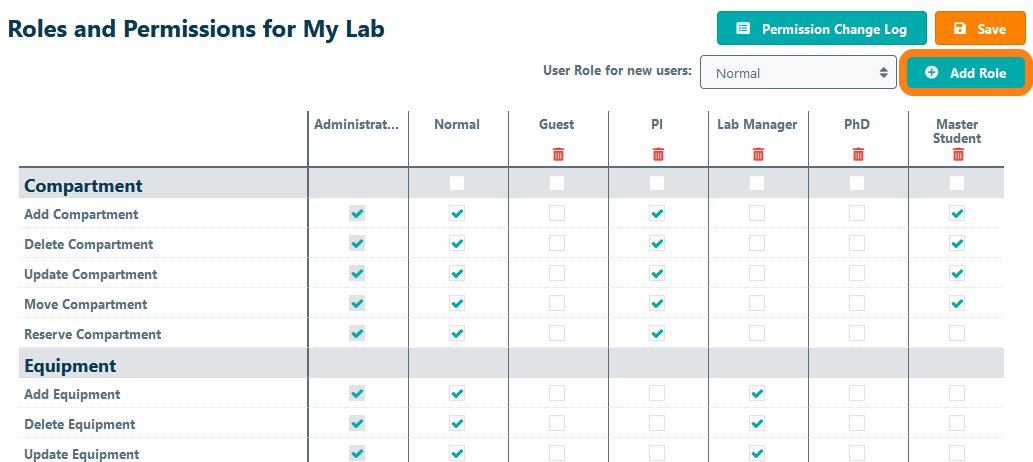
After creating these user roles, the permissions should be set accordingly for the teacher and students. When setting up permissions, it is important to decide if teachers should be able to access all lab notebooks for all courses or only for certain courses. If teachers should be able to view all lab notebooks in each course, then we recommend setting the permissions for the teacher role in such a way that they are able to view and update all experiments. This is covered by the following permissions:
- View Own Experiment – required for viewing experiments you created or are assigned to as a collaborator
- View Other Experiment – required for viewing experiments created by other users
- Configure Own Experiment – required for adding and updating experiments or sections with data of experiments you created or are assigned to as a collaborator
- Configure Other Experiment – required for adding and updating experiments or sections with data of experiments of other users
Note: depending on the number of teachers involved in a course, we do not recommend to give all teachers the administrator role. Rather, you should limit the number of administrators to just 1 or 2 individuals who will fully manage the system. Students should only be able to view and edit their own experiments (i.e. experiments where they are designated as a collaborator in the ELN).
- View Own Experiment – required for viewing experiments you created or are assigned to as a collaborator
- Configure Own Experiment – required for adding and updating experiments or sections with data from experiments you created or are assigned to as a collaborator
In addition to setting experiment permissions, it is also important to make sure that other system permissions are set in accordance to required functionality. This may include project permissions, study permissions, sample permissions and protocol permission as discussed in the next steps.
3- Adding teachers
Once the group and permissions have been set up in accordance with the desired functionality, the teachers for the course(s) can be invited to join the group. Navigate to Group Members in the Configuration menu to send an invitation to the teachers.
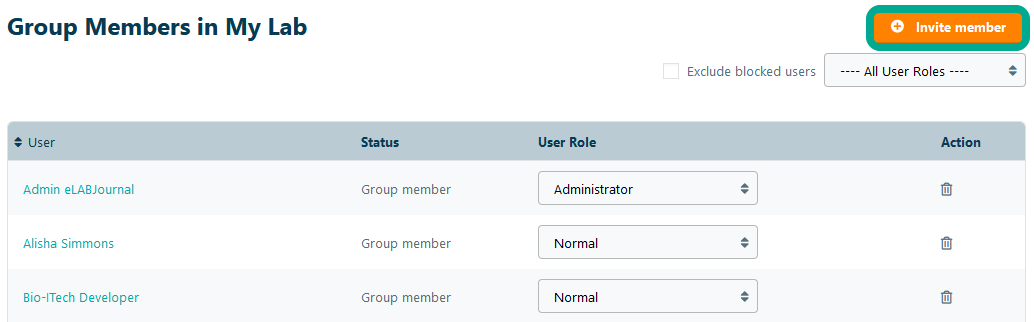
Once the teachers have accepted the invitation, they will be listed as users on the Group Members page where you can change their user role. If the default user role for the new users is set as a Teacher, then invited person will automatically be assigned the role of Teacher. Note: once all teachers have been added to the system, we recommend changing the default user role to Student to prevent students from being assigned Teacher-level permissions during account set-up.
4- Organizing courses per year
In most organizations, the same courses are taught every year. It is therefore recommended to organize classes by year. To achieve this, you can create a project group for each school year. In this way, the teacher will be able to easily browse through the different courses by year and view the corresponding lab notebooks.
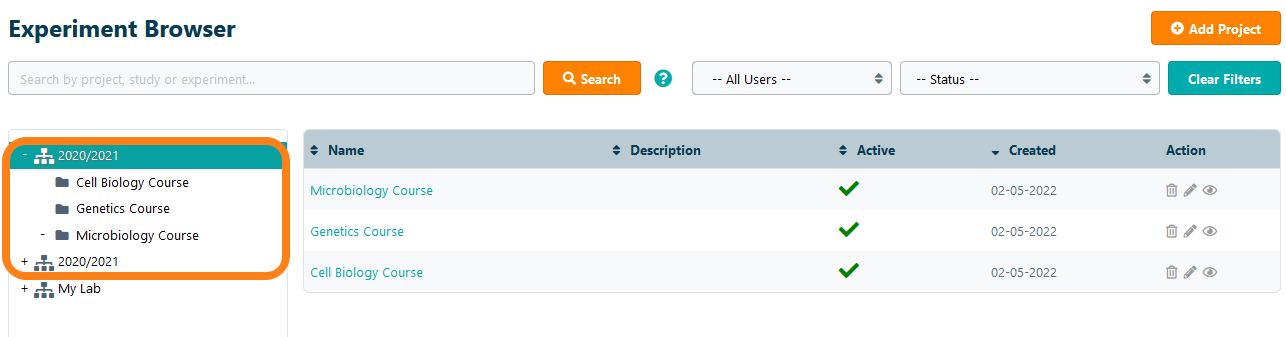
5- Adding courses and assigning teachers
To arrange and document courses in the system, we recommend defining a course as a project. When you create a project within a project group (according to step 4), you automatically have the option to add the course to the corresponding year and assign teachers as collaborators to that project. Teachers designated as collaborators at the course-level will automatically be added as a collaborator to all subsequent experiments. Note: adding the teacher as a collaborator in a course is required if the system is configured to prevent teachers from viewing notebooks in other courses. If teachers are permitted to view ALL experiments, then this setting is not required but it has to be made sure that the courses are listed in the Experiment Browser under the teacher name. For understanding how accessing experiments is organized, please read the in-depth documentation about experiment collaboration .
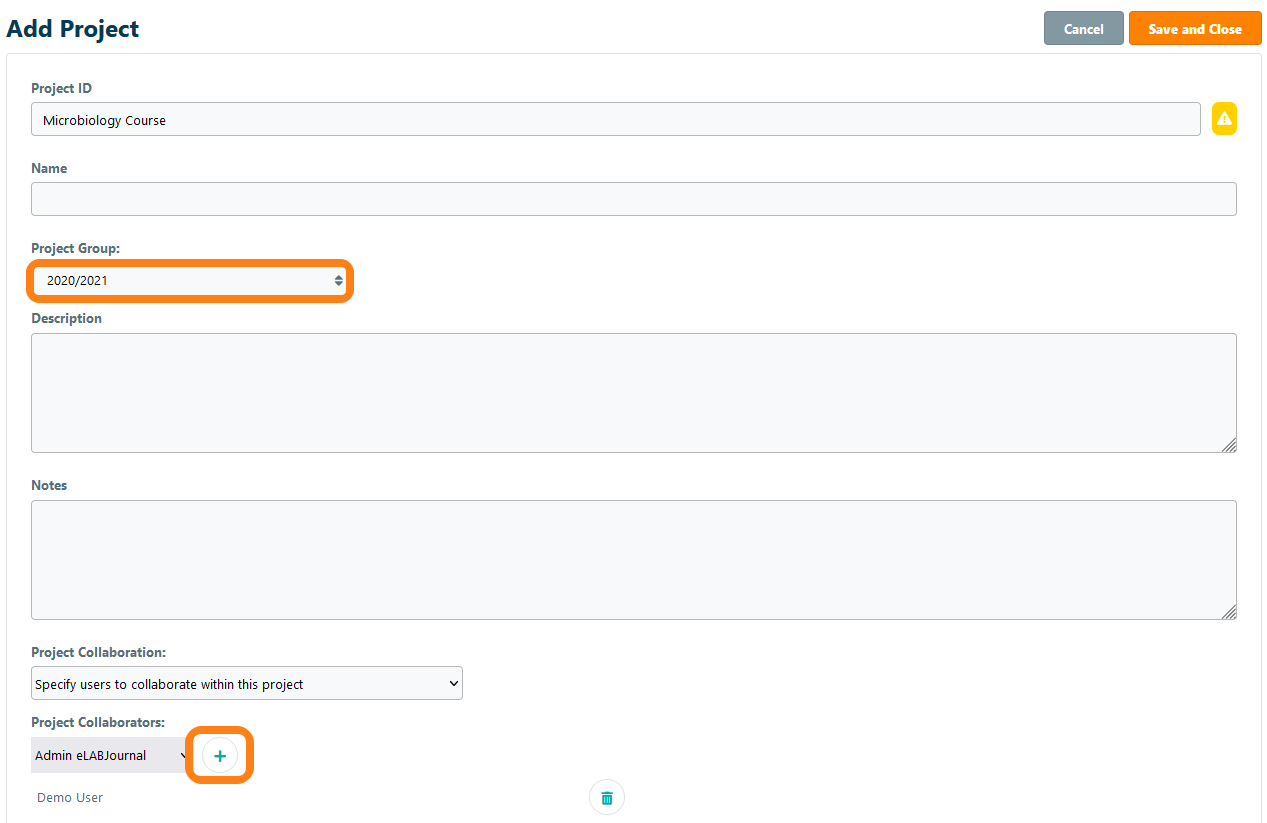
Note that you can also add teachers to a course after it has been created by updating the project. Please make sure to keep the option update collaborators in existing experiments of this project active to ensure that the teacher is also added as a collaborator to existing experiments in notebooks.
6- Creating Experiment Templates
To organize the course in the most efficient manner, it is recommended to create experiment templates. In an experiment template you can add all relevant sections with instructions, protocols, samples and consumables that are needed and also define the sections in which data needs to be collected by the student. In this way, students can add an experiment and choose the corresponding experiment template they need to do on that day from a list of experiment templates. When creating an experiment template, it is recommended to label the templates in a way that students can easily find the one they have to carry out. Make sure that the created experiment templates are shared so that they are available for students when adding an experiment from an experiment template.
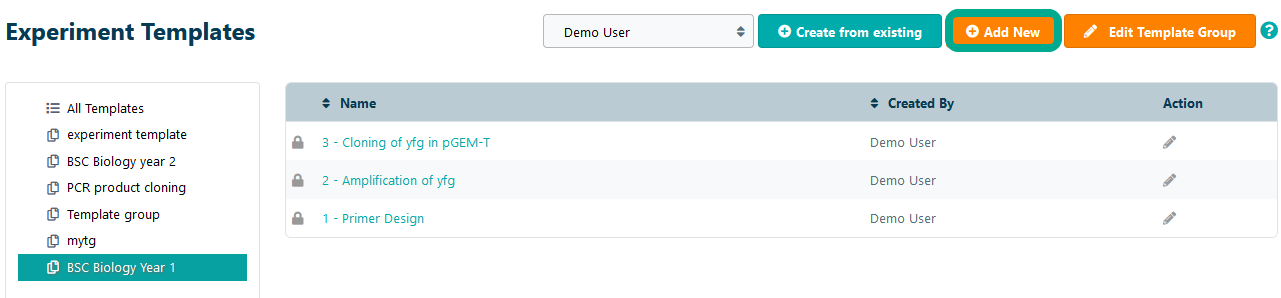
With the above-mentioned configurations, the students themselves are able to add the experiment to their lab from a list of experiment templates. As a teacher, you can also choose to prepare the entire course for the students in accordance with the desired course layout. In that case, you need to group experiment templates to create a study template.
7 - Inviting students
Once the practical course has been set-up, you can invite the students to the group by navigating to Group Members in the Configuration menu. In practical classes, you usually need to add a large number of users to the system. You can use the Invite from email list option, to send instructions to up to 100 students at once. This allows all students at once to set up their accounts and to get access to the student practical courses. If you are setting up the system for the first time, it is strongly advised to first validate your set-up by changing the user role of one of the involved teachers to a student and test the whole system.
Please make sure the default user role is set to Student, to ensure that all students are assigned to the correct user role with accompanied permission settings when entering the system.
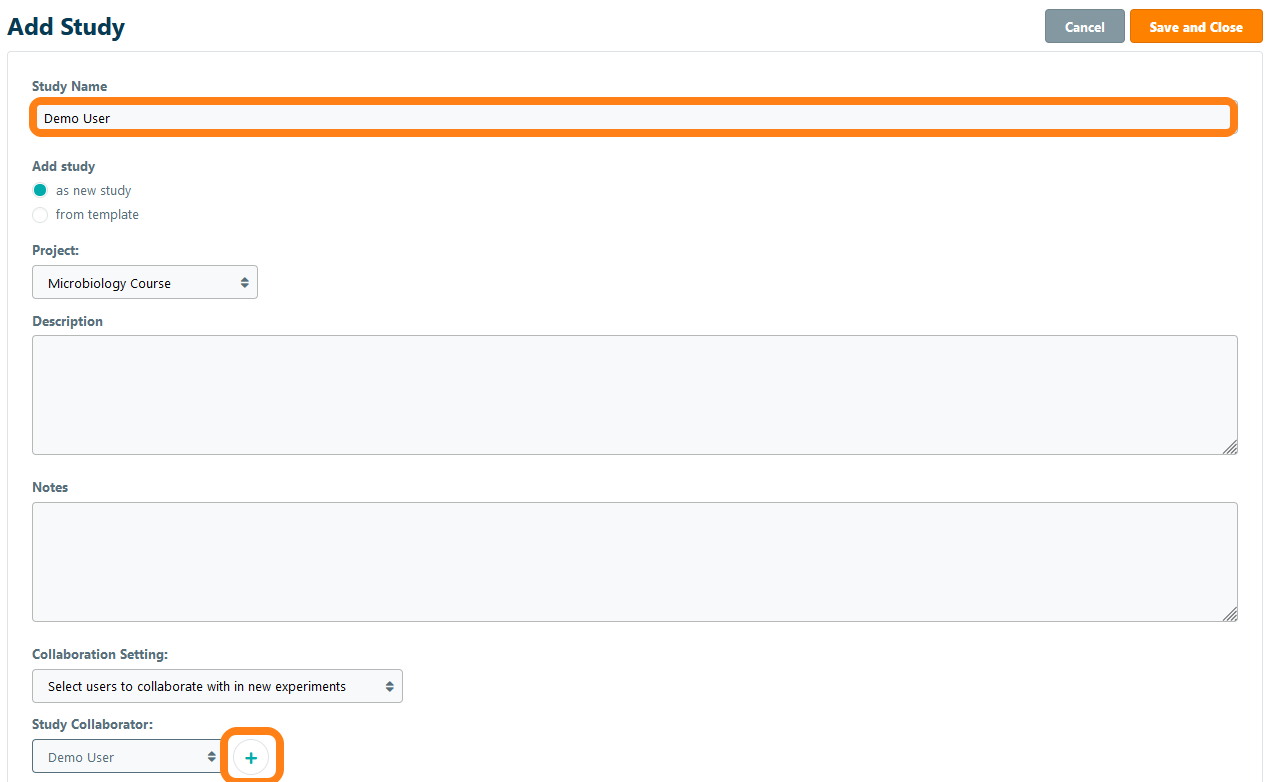
8 - Creating student notebooks
Once the students are signed up as active users in the system, you can set up their lab notebooks for each course. It is recommended to create a study for each student or workgroup (in case several students work together) to track and document results in a lab notebook. Use the name of the student(s) as the study name and make sure that the students are set as the study collaborator in the system. Also, include the teacher as the collaborator on the study level to make sure that experiments can be accessed by the teacher in all cases as the collaboration setting for the study overrules the collaborator setting of the project. To understand how study collaboration works, please read the relevant documentation about study collaboration. In case you have grouped experiment templates to a study template, you can choose the study from the corresponding template. In that way, all experiment templates in that study template will be added automatically to student's digital lab notebook.
Note that you can also add students to their lab notebook after it has been created by updating the study. Please make sure to keep the option update collaborators in existing experiments of this study active to ensure that the student can be added as a collaborator to already existing experiments.
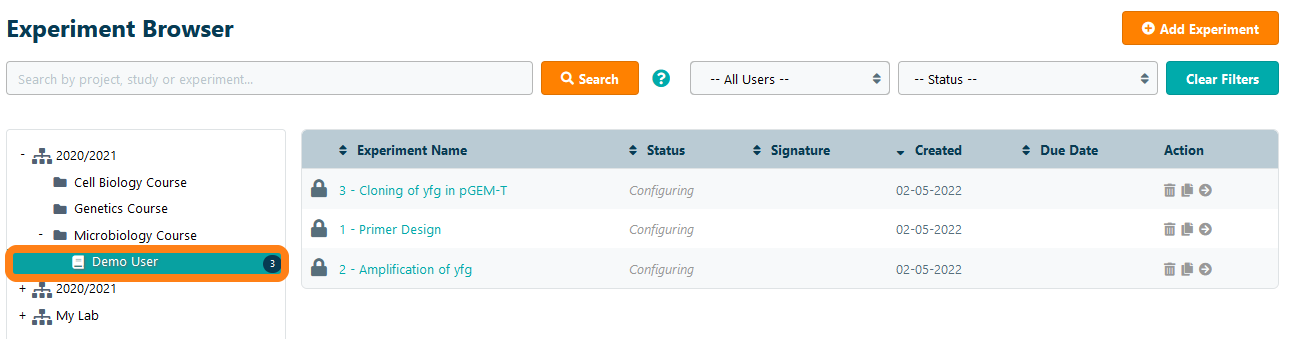
With the above-described configuration, you make sure that students can only view their own lab notebooks, while teachers can access the lab notebooks of all students in the course. Students are able to enter data while the teacher can view, correct and grade the documented experiments. Students can let their teachers know when they are finished with their experiments by signing the experiment. In case the optional requirement for a second digital (witness) signature is activated for the lab, the student can assign the teacher as a witness. In this way, the teacher will receive a message to counter-sign and witness the student's lab notebook. The teacher can add comments to the signed lab notebook and can either choose to accept to decline the signed experiment. When declining, the experiment is unlocked for the student, allowing an additional improvement of their lab notebook. When the experiment is accepted by the teacher it becomes permanently locked.